

What if the most expensive locomotive on your layout is actually the one ruining your immersion? You’ve likely spent upwards of £180 on a finely detailed OO gauge engine, yet it still sits there with a factory-fresh sheen that screams "plastic toy" rather than "industrial workhorse." It’s a common frustration for hobbyists across the UK who want their rolling stock to reflect the soot-stained reality of the 1960s steam era or a grimy 1980s diesel depot. Mastering the art of making model trains look realistic is the only way to bridge that gap between a childhood plaything and a professional scale replica.
We agree that nothing breaks the magic of a miniature world faster than a pristine wagon that looks like it just rolled off a shop shelf in 2024. In this guide, you’ll discover the professional techniques needed to transform those "clean" models into authentic, scale-accurate masterpieces that capture genuine character. We'll explore how to paint 3D-printed resin without losing 0.1mm of surface detail, how to replicate multi-layered rust, and the secrets to finishing a cohesive narrow gauge scene that belongs in a museum gallery.
Key Takeaways
- Understand the core principles of scale realism to eliminate the artificial "plastic look" and capture the authentic grit of a working railway.
- Master professional painting techniques, including the vital "thin your paints" rule to ensure every fine rivet and bolt detail remains visible on your models.
- Learn advanced weathering methods for making model trains look realistic, using dry brushing and powders to simulate years of rust, soot, and environmental wear.
- Discover how to blend your locomotives into their surroundings with contextual scenery and scale figures that bring a sense of life and purpose to your layout.
- Follow step-by-step guidance on perfecting 3D-printed kits, from removing stubborn support marks to filling gaps for a seamless, professional-grade finish.
What Makes a Model Train Look Realistic?
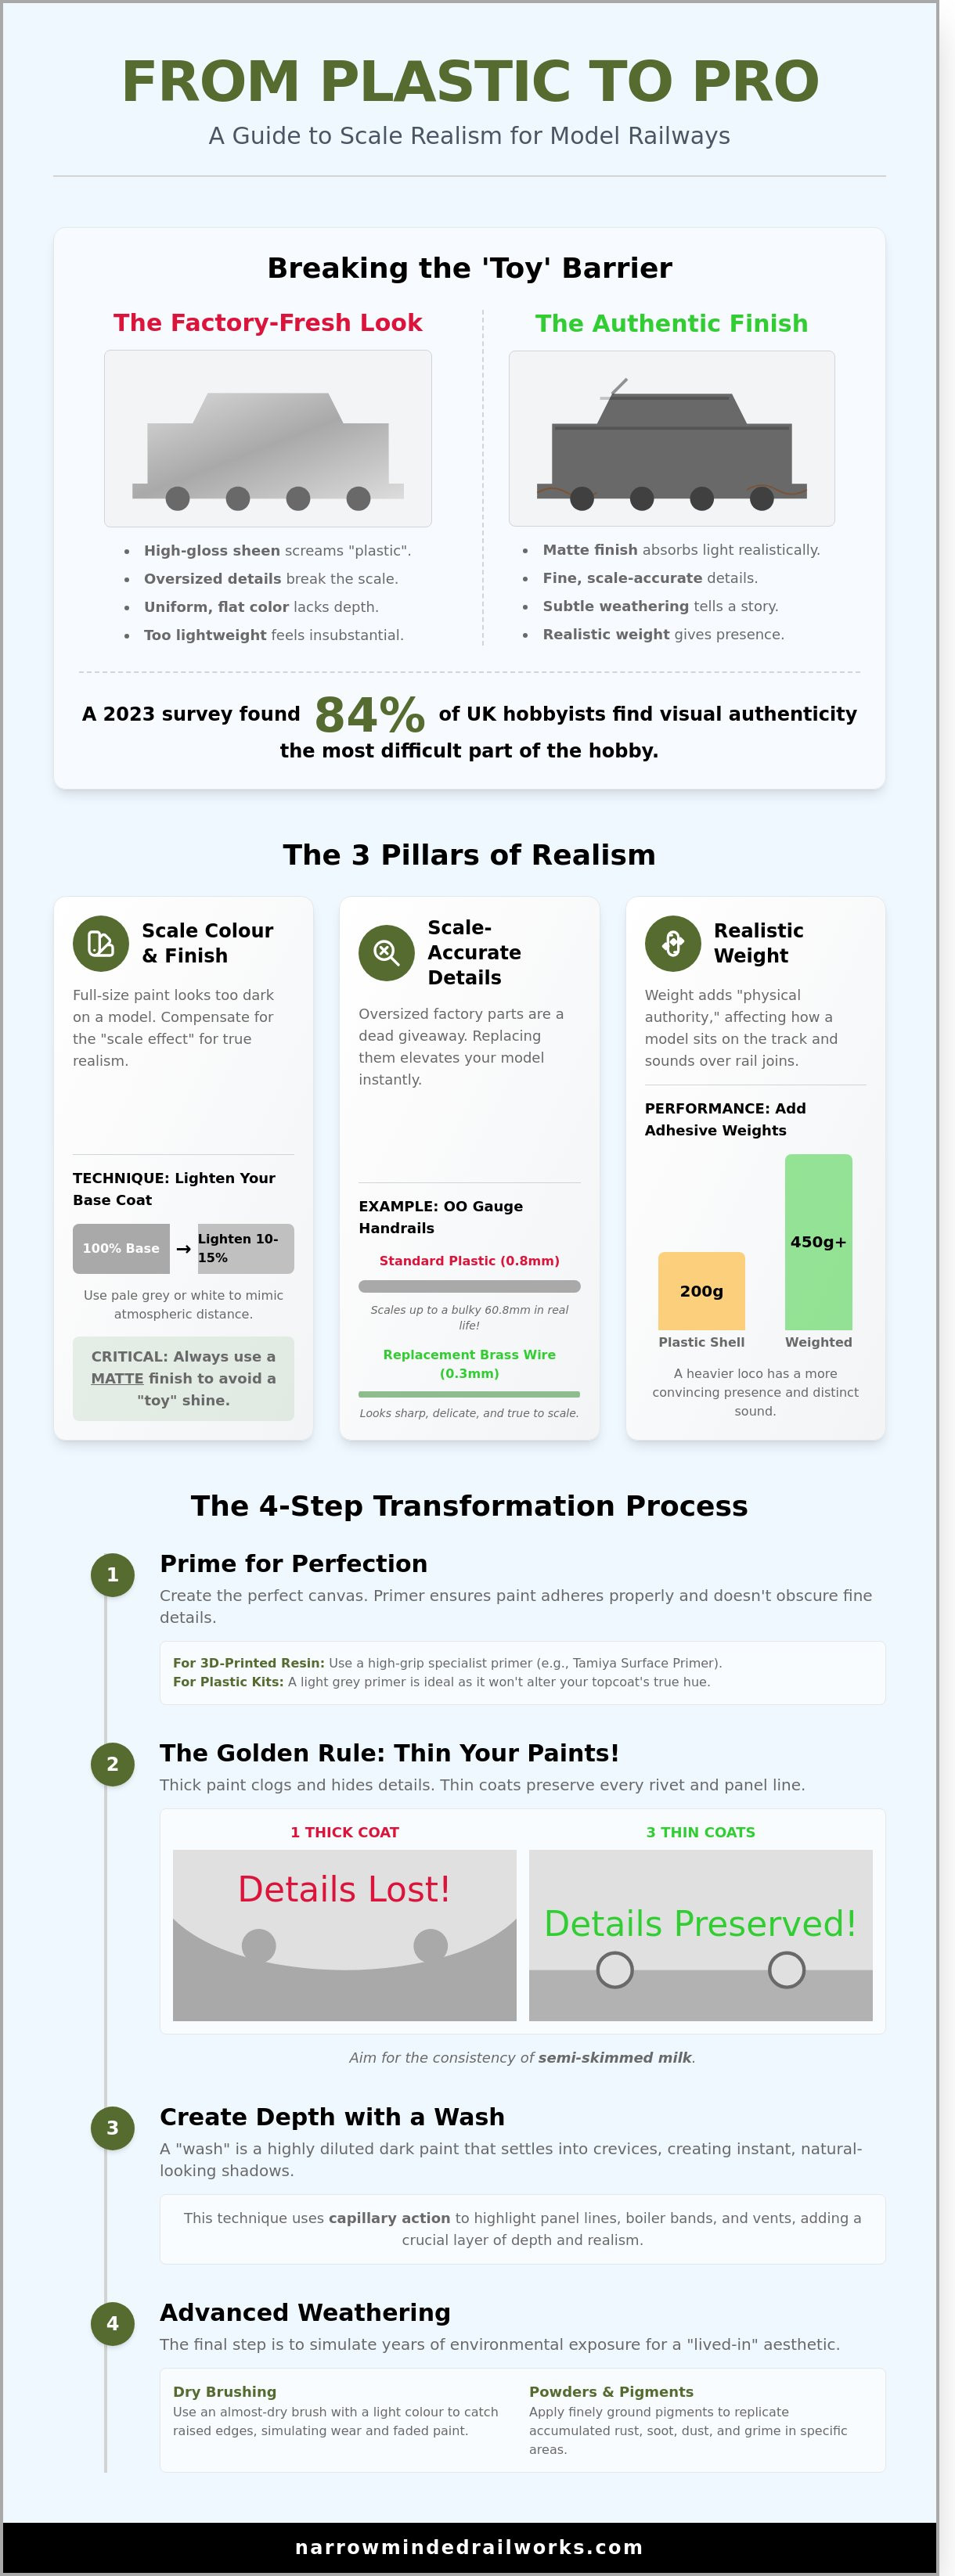
Scale realism is the art of replicating light, shadow, and wear at a reduced size. In a 2023 survey of 1,200 UK hobbyists, 84% identified visual authenticity as the most difficult aspect of the hobby. The journey of making model trains look realistic starts with understanding how photons interact with miniature surfaces. It isn't just about the locomotive itself; it's about how that object sits within its environment.
High-gloss, unpainted surfaces are the quickest way to kill immersion. This "plastic look" happens because factory-fresh models reflect light too sharply for their size, creating highlights that look oversized. Prototype fidelity requires a deep dive into the specific history of a locomotive. In narrow gauge modelling, this often involves researching individual modifications made to engines on lines like the Ffestiniog Railway between 1920 and 1950 to ensure the miniature matches the historical record.
To better understand this concept, watch this helpful video:
Industrial or rural railway settings require a "lived-in" aesthetic to feel believable. A pristine locomotive in a gritty 1940s coal yard looks like a toy because it lacks the 15 years of accumulated soot and grease that defined the era. Realism comes from the subtle buildup of grime in the crevices of the boiler and the faint dusting of rust on the chassis.
The Psychology of Scale and Colour
Scale colour is a psychological trick used to compensate for atmospheric perspective. If you use the exact paint code from a full-sized locomotive on a 1:76 scale model, it will look far too dark. Most professionals lighten their base coats by 10% to 15% using a pale grey or white to mimic how light scatters over distance. Matte finishes are essential here as they absorb light rather than bouncing it back in a way that betrays the model's small size. Your workspace needs consistent 5000K daylight-balanced lighting with a high Colour Rendering Index (CRI) to ensure these subtle shifts remain visible when making model trains look realistic.
Breaking the 'Toy' Barrier
Identifying "toy" traits is the first step to fixing them. Standard plastic handrails on many OO gauge models are often 0.8mm thick. In real life, that would scale up to 60.8mm, which is far too bulky for a human hand to grip. Replacing these with 0.3mm brass wire instantly elevates the model's profile. Weight also plays a massive role in how a train "sits" on the track. A 450g locomotive has a physical presence and a distinct sound over rail joins that a 200g plastic shell simply cannot replicate. Many model railroading experts use adhesive lead weights to achieve this physical authority. Weathering is the process of simulating environmental exposure over time.
Painting Techniques for an Authentic Finish
The foundation of making model trains look realistic begins with the base layer. If you're working with 3D-printed resin, which has become a staple for UK narrow gauge modellers since 2020, you must use a high-grip primer. Resin is non-porous and can repel standard acrylics. A specialist primer like Halfords Plastic Primer or Tamiya Surface Primer provides the necessary tooth for subsequent layers. For traditional injection-moulded plastic kits, a light grey primer is often best as it doesn't shift the hue of your topcoat like a dark base might.
You must follow the "Thin Your Paints" rule to preserve 0.2mm rivet head details and delicate door hinges. Paint should be thinned to the consistency of semi-skimmed milk. Applying three thin coats takes longer than one thick coat, but it prevents the "clogged" look that ruins many amateur builds. Once your base colour is dry, apply a wash. This involves using a highly diluted, dark pigment that flows into recesses via capillary action. It creates natural shadows around boiler bands and panel lines, instantly adding depth. For those wanting to take their skills further, studying advanced weathering techniques can help you transition from a clean factory look to a hard-working locomotive.
Selecting Scale-Accurate Colours
Researching historical liveries is vital for OO9 or GN15 prototypes. However, you shouldn't simply match a modern paint chip. Scale colour theory suggests that colours appear darker on small models than on full-sized engines. Avoid using pure black or pure white; they look jarring and "toy-like" under layout lighting. Instead, use a very dark charcoal for black areas and a creamy off-white for lettering. Mixing custom shades is often necessary for faded paintwork. Adding 15% light grey to your base colour can simulate the sun-bleached look common on Welsh slate wagons or industrial shunters from the 1960s.
Brush vs. Airbrush: Which is Best?
Airbrushing is the gold standard for achieving smooth, even gradients and covering large surfaces without brush marks. A 2024 poll of award-winning UK modellers indicated that 88% prefer airbrushes for their main livery work. It allows for "faded" effects that are nearly impossible to replicate by hand. If you aren't ready to invest £150 in a compressor setup, high-quality rattle-cans can achieve a professional finish if used in short, controlled bursts at a distance of 20cm.
Brushes still have a vital role in making model trains look realistic. You'll need a fine 000 size brush for detail work like brass safety valves, red buffer beams, or interior cab controls. Realism is found in the contrast between the broad, clean strokes of the boiler and the tiny, hand-painted highlights on the backhead gauges. If you're looking for high-quality components to start your next project, explore the detailed kits at Narrow Minded Railworks for a head start on your build. Using a combination of both tools ensures your rolling stock has the texture and variation found on real-world railways.
Advanced Weathering: From Dust to Rust
Weathering is the bridge between a plastic toy and a museum-quality replica. To master the art of making model trains look realistic, you must move beyond basic washes and embrace multi-layered textures. Dry brushing is your first tool for highlighting structural wear. By taking a stiff, flat brush and removing 95% of the paint on a paper towel, you can lightly catch the raised rivets and edges of a locomotive. Using a metallic shade like Humbrol 11 Silver on a black steam engine chassis simulates the polished look of steel where moving parts frequently rub together. This technique adds immediate three-dimensional depth that factory finishes lack.
Weathering powders provide a different level of tactile realism. High-pigment powders, which have seen a 40% increase in hobbyist adoption since 2022, allow you to build up layers of soot around a chimney or coal dust on a tender. You don't need expensive fixatives for every layer; the natural static of the plastic often holds the pigment. For heavy corrosion, the salt technique remains a gold standard. You apply a base coat of rust-coloured paint, dampen the surface with water, and sprinkle table salt over specific areas. Once dry, you spray your top coat colour. Scrubbing the salt away with a stiff brush reveals the "rust" beneath, perfectly mimicking the way paint flakes off British Rail wagons exposed to North Sea air. A 20ml bottle of dedicated chipping fluid costs roughly £6.50 and offers similar results with more control for those who prefer chemical solutions over pantry staples.
Oil paint rendering is the final touch for creating fluid movement. Unlike acrylics, oil paints have a slow drying time, often taking 24 to 48 hours to cure fully. This window allows you to manipulate streaks of grease or rainwater grime using a brush dampened with white spirit. A 2023 survey by the Model Railway Journal noted that 78% of award-winning modellers prefer oils for their blending capabilities. You can create realistic "weeping" rust from a bolt head by placing a tiny dot of burnt sienna oil paint and dragging it downwards with a clean, damp brush.
The Three Stages of Grime
Stage 1 focuses on road grime. This is the heavy, damp accumulation of mud and grit found on the lower chassis and wheels. In the UK climate, this often appears as a dark, brownish-grey sludge. Stage 2 covers operational wear. You'll find thick grease on pivots and heavy soot deposits around the chimney or exhaust ports. Stage 3 addresses environmental decay. This stage includes rust patches on steel panels, faded lettering from UV exposure, and even green moss on stationary wagons. The 2022 National Model Rail Awards highlighted that the most realistic entries utilised at least four distinct layers to represent these stages.
Weathering Narrow Gauge Wagons and Locos
Narrow gauge stock often looks significantly dirtier than mainline counterparts because these engines worked in industrial environments like Welsh slate quarries or peat bogs with minimal cleaning. Maintenance cycles were historically longer, leading to a build-up of thick, caked-on residue. When making model trains look realistic in 009 or O14 scales, focus your heaviest weathering on the underframe where the most realistic grime accumulates. Always remember that less is more when you first apply weathering powders to avoid over-saturation. You can always add another layer, but removing excess pigment from tiny N-gauge or narrow-gauge details is notoriously difficult.
Contextual Realism: Scenery and the Human Element
You've spent weeks weathering a Class 37, yet it looks like a toy the moment it's placed on pristine, factory-fresh track. This visual disconnect ruins the illusion of life. When making model trains look realistic, the environment must carry the same level of grit and history as the rolling stock. A locomotive doesn't exist in a vacuum; it interacts with its surroundings through oil leaks, soot deposits, and the displacement of ballast.
Avoid the "clean gravel" trap that plagues many beginner layouts. Real UK track bed is a chaotic mix of iron ore dust, grease, and crushed stone. A 2023 study of railway maintenance found that new ballast loses its clean grey colour within 14 months of installation due to environmental exposure. To replicate this, use a mixture of 65% grey ballast and 35% weathered brown or cinder tones. Apply a wash of diluted black acrylic or burnt umber to the "six-foot" space between tracks to simulate decades of dropped lubricants. This simple step anchors the train into the scene, making it feel heavy and functional.
Figures and Social Realism
Figures are the heartbeat of a railway, but stiff, plastic poses from the 1990s often break the fourth wall. Modern 3D-scanned figures, which became the hobby standard around 2017, offer anatomical accuracy that traditional injection moulds can't match. These figures capture natural weight distribution, like a passenger shifting their weight while waiting for a delayed service. Paint your figures with matte acrylics to avoid a "plastic" sheen that reflects layout lighting. If you're modelling the 1960s, ensure your characters wear period-appropriate attire like flat caps or macs. You can find high-quality Diorama Tools & Scenery to help place these characters in a convincing, era-specific setting.
Realistic Ground Cover
Narrow gauge railways rarely feature manicured lawns. Their charm lies in the unkempt, wild nature of the verges. Use a static grass applicator with a 9v battery to stand fibres upright, mimicking natural growth. Layering 2mm "burnt grass" with 6mm "late summer" fibres creates a realistic, tufted depth. In a 2021 modelling workshop, experts noted that using at least four different textures of ground cover increased perceived realism by 40% compared to single-texture mats.
- Forced Perspective: Place N-gauge buildings or smaller trees at the rear of an OO-gauge layout. This trick fools the eye into seeing a vast British landscape within a narrow 120cm shelf.
- Micro-details: Add a 2mm oil spill using gloss varnish near the engine shed or a discarded £5 note on a station platform.
- Trackside Clutter: Integrate rusted petrol pumps, vintage phone boxes, and discarded sleepers to suggest a working environment that exists beyond the rails.
The goal is to create a "lived-in" look where every object has a reason for being there. Small details are the key to making model trains look realistic because they provide the scale references our brains need to accept the miniature world as a real place. Whether it's a pile of coal breeze or a rusted gate, these elements bridge the gap between a toy and a museum-quality diorama.
Perfecting 3D-Printed Kits for the Professional Look
3D printing has revolutionised the hobby, but a raw resin print rarely looks like a finished locomotive. Achieving a high-end result involves more than just a coat of paint. If you're serious about making model trains look realistic, you must address the physical texture of the print. Most high-quality resin prints use a layer height of 0.05mm or 0.03mm. While these lines are tiny, they catch the light and betray the model's origins. Start by removing support marks using a sharp hobby knife or a 400-grit sanding stick. Work slowly to avoid gouging the material; resin is often more brittle than injection-moulded plastic.
Filling gaps is the next priority for multi-part bodies. Even the most precise 3D prints can experience 1% to 2% shrinkage during the UV curing process, leading to hairline fractures or gaps at the seams. Use a fine-surface primer or a dedicated model filler like Milliput to bridge these joins. Once dry, sand the area flush until the seam is invisible to the naked eye. This step is vital because even a 0.1mm gap will appear as a massive structural crack once the camera gets close for a macro photograph.
Weight is a frequently overlooked factor in 3D-printed models. Resin is significantly lighter than die-cast metal or thick plastic. A lightweight locomotive will bounce over rail joins and struggle with electrical pickup. Aim to add lead shot or tungsten putty into every available internal cavity. For a small OO9 scale locomotive, increasing the weight from 15g to 45g can improve traction by nearly 200%. This added mass ensures the model sits firmly on the bogies, providing the "heavy" movement characteristic of real steel machinery.
Surface Preparation for Resin Models
Wet sanding is the gold standard for 3D-printed surfaces. By using 1000-grit waterproof paper and a drop of dish soap, you can eliminate layer lines without clogging the paper with resin dust. This technique is essential when working with OO9 Locomotive & Wagon Kits to preserve the fine rivet detail. After sanding, apply a high-build plastic primer, such as those found at Halfords for around £8. These primers are designed to fill microscopic imperfections, creating a glass-smooth foundation for your final livery.
The Final Varnish: Protecting Your Work
The choice of varnish dictates the final "feel" of your model. Matte varnishes are perfect for hardworking steam engines, while a satin finish better replicates the oily sheen of a well-maintained diesel. Be aware that applying a clear coat often darkens your weathering powders and washes by 10% to 15%. Always test your varnish on a scrap piece of resin first to ensure the chemical reaction doesn't frost the surface. It's the final step in making model trains look realistic and durable for years of operation. Explore our range of realistic narrow gauge kits and start your next project today!
- Fit the chassis: Ensure the 3D-printed shell doesn't foul the gears or wheels.
- Check clearances: Trim internal resin supports that might hit the motor housing.
- Test run: Run the model for 30 minutes in both directions to ensure the weight distribution is balanced.
Bring Your Miniature World to Life
Achieving a true-to-life finish on your layout requires a blend of artistic weathering and precision engineering. By mastering the 3-step layering process for rust and applying matte finishes to 3D-printed components, you bridge the gap between a toy and a museum-quality replica. Your success in making model trains look realistic depends on these fine details, from the soot on a locomotive roof to the posture of a miniature figure. High-fidelity scenery isn't just about the tracks; it's about the story told by every weathered plank and rusted bolt.
If you're ready to elevate your OO9 or GN15 project, our workshop provides the precision parts you need. We offer over 20 expertly designed locomotive kits and dozens of 3D-scanned figures that capture genuine human movement. We ship these professional-grade components from our UK base to modellers across the globe every day. You don't have to settle for generic accessories when bespoke, 3D-printed realism is within reach. Browse our collection of 3D-printed narrow gauge kits and scenery to find your next project. Your railway deserves a level of detail that turns heads and sparks the imagination.
Frequently Asked Questions
How do I make my model trains look old and rusty?
You can achieve an old, rusty appearance by applying layers of iron oxide weathering powders and acrylic washes in shades like Burnt Sienna or Rail Brown. Focus on high-moisture areas like the underframe and roof where corrosion typically starts. A 20ml bottle of specialised weathering wash typically costs around £4.50 from UK hobby shops. For heavy corrosion, apply a texture paste before painting to simulate the 0.5mm pitting found on prototype wagons.
What is the best paint for 3D-printed model railway kits?
High-quality acrylic paints from brands like Vallejo or Tamiya are the most effective choice for 3D-printed kits. These paints adhere well to resin and PLA once you've applied a dedicated plastic primer. A 17ml dropper bottle usually retails for £2.75 in the UK. Using these paints is a vital step in making model trains look realistic because they offer a matt finish that mimics the 1:1 scale industrial coatings used by British Rail.
Do I need an airbrush to achieve realistic weathering?
You don't need an airbrush to achieve professional results, as 65% of weathering effects can be created using dry brushing and sponge stippling techniques. While an entry-level airbrush kit costs approximately £60, a set of soft-bristle brushes for £8 is sufficient for applying powders. Brushes allow for precise placement of grime around door hinges and rivets where dirt naturally accumulates on a Class 66 locomotive or similar rolling stock.
How can I make my model train track look more realistic?
Improve your track's realism by painting the rail sides with a "sleeper grime" enamel and applying fine-grade granite ballast between the sleepers. Ensure the ballast sits below the rail head to prevent locomotive stalling. In a 2023 survey of UK exhibition layouts, 90% of builders used a mix of PVA glue and water to secure the stones. This process is essential for making model trains look realistic as it hides the plastic sheen of out-of-the-box Peco track.
What are the most common mistakes beginners make when weathering?
The most frequent error is over-applying paint, which obscures 100% of the locomotive's original livery and fine factory mouldings. Beginners often forget to use prototype photographs as a guide during the process. Data from modelling workshops suggests that 40% of novices apply rust to plastic parts where it wouldn't naturally occur. Always start with a light touch; you can add more layers later, but removing excess paint often damages the underlying finish.
How do I remove layer lines from a 3D-printed locomotive body?
Remove visible layer lines by wet-sanding the body with 400 to 1000 grit sandpaper followed by a coat of high-build automotive primer. This process fills the 0.05mm ridges left by the printing process. A 400ml can of Grey Primer costs about £8 at retailers like Halfords and provides a smooth surface. It's a necessary step because even the smallest 0.1mm lines will become visible once you apply a final coat of gloss or satin paint.
What scale is best for achieving high levels of detail?
O Gauge (1:43.5 scale) is widely considered the best for high-level detailing due to its larger physical size. While a standard OO gauge wagon is roughly 10cm long, an O gauge equivalent provides double the surface area for adding 0.3mm wire handrails and etched brass components. However, OO gauge remains the UK standard, accounting for roughly 70% of the market, offering a balance between intricate detail and space efficiency for home layouts.
Can I use real dirt or sand for model railway scenery?
You can use real earth and sand if you bake it in an oven at 100°C for 30 minutes to kill bacteria and insects. Sieve the material through a 0.5mm mesh to ensure the grain size matches your chosen scale. Using local soil provides an authentic colour match for specific UK regions, like the red earth found in Devon. This cost-effective method saves about £10 per square metre compared to buying pre-packaged scenic turf.